How to add unallocated space to existing partition?
Open Disk Management with administrator permissions.
An easy way to do so is to type Computer Management in the search box on the taskbar, select and hold (or right-click) Computer Management, and then select Run as administrator > Yes. After Computer Management opens, go to Storage > Disk Management.
Method 1: Extend adjacent drive in Disk Management
Step 1 Open Disk Management. Use Windows + R to open Run and type diskmamt.msc in Run box and click OK button.
- Or Right Click in My Computer Icon and click – Manage – and Choose Disk Management.
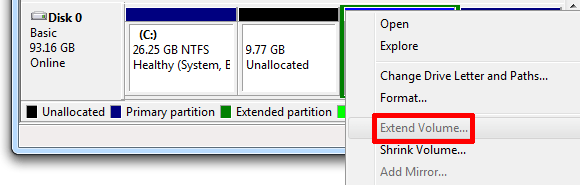
Step 2 Select partition adjacent to unallocated space and select “Extend Volome”. (sure you have to right click to unallocated and you will see all the options)

Step 3 The “Extend Volume Wizard” pops up and click “Next” button here.

Step 4 In this step you can select disks. You can use space on one or more disks to extend the volume. Also you can set volume size, but you can only extend the volume to the available space shown in the dialog box. Because the disk cannot be converted to dynamic or the volume being extended is a boot or system volume. If you are confused by this step, you can just click “Next” button and follow all defaulted settings.
Step 5 Click Finish button to finish the process. Now the unallocated space is gone and it has been added to adjacent partition.
Disk Management is not able to merge unallocated space to any partition. Many times, when you simply right click partition and select “Extend Volume”, the “Extend Partition” option is greyed out, as follows:
Another Method is to create new Volume From Unlocated space.
-
Right-click the unallocated volume.
-
Choose New Simple Volume from the shortcut menu.
The New Simple Volume Wizard appears.
-
Click the Next button.
-
Set the size of the new volume by using the Simple Volume Size in MB text box.
The size is already preset to equal the entire disk capacity, which is recommended. If you need to set it to a smaller size, do so. The remaining space on the drive continues to be unallocated.
-
Click the Next button.
Windows lets you assign the drive a letter, or you can mount the drive on an NTFS volume as a folder. Or, you can do neither, depending on how you fill in the wizard.
-
(Optional) Choose a letter for the new volume.
My advice is to use the letter that’s provided.
-
Click the Next button.
-
Ensure the option Format This Volume with the Following Settings is chosen.
-
Ensure that the NTFS format is chosen.
-
Click the Next button.
-
Click the Finish button to create the new volume.
Windows prepares the disk by formatting it, laying down the tracks (or parking spaces) for the files. The amount of time taken to complete the operation depends on the size of the volume. Larger disk drives take longer to format.
The display in the Disk Management console shows the drive being formatted; you can watch its progress in the Status column at the top center of the window. The drive isn’t assigned its new letter until after it’s formatted.
-
When the operation is complete, you can close the Disk Management console.
The newly created disk drive appears in the Computer window. It’s immediately available for use.
The new volume may have less capacity than anticipated. The missing bytes are overhead, used by the formatting process.
How to Replace Laptop Hard Drive to SSD without Reinstalling Windows