Are 10 days not enough for you to decide if Windows 11 is better than Windows 10? Here’s how to extend it to 60 days.
1. How to Check and Extend Rollback Limit for Go Back to the Previous Version
You can run the DISM (Deployment Image Servicing Management) command-line utility to extend the rollback period from 10 days to 60 days. Here’s how to do it.
- Press the Win + X key to open the WinX menu.
- Next, click on Windows Terminal (Admin) to launch the terminal app in elevated mode.
- By default, Windows Terminal uses PowerShell to run the commands. If you want to use Command Prompt, click the drop-down button in the toolbar and select Command Prompt.
- Next, type the following command and press enter to view the current time limit for the Go back feature:
DISM /Online /Get-OSUninstallWindow -
- The output will show the number of days (10) set on your system currently.
- If you see the Error 1168 – Element not found, it means the old backup is deleted, and you cannot go back to the previous version for the current version.
- Next, type the following command to extend the 10-day limit for Go back to the previous version:
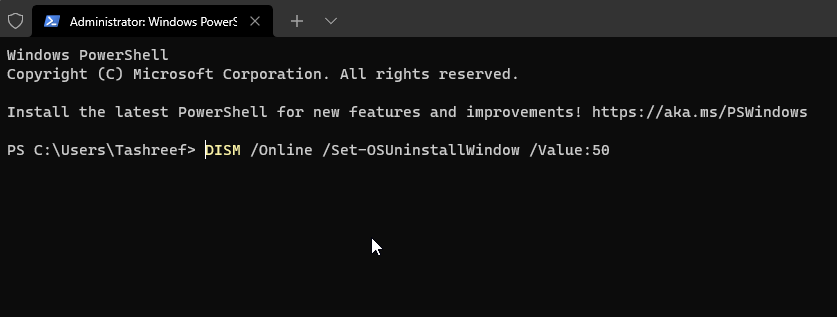
DISM /Online /Set-OSUninstallWindow /Value:NDays - In the above command, replace NDays with the number of days you want to extend the time limit to. For example, if you want to extend it to 50 days, the complete command will look something like this:
DISM /Online /Set-OSUninstallWindow /Value:50 - Press Enter and wait for the command to execute. The output will show The operation completed successfully message.
That’s it. The next time you perform an upgrade or install feature updates, Windows will keep the backup for 50 days before deleting it.
2. Extend the Go Back to Previous Version Period Using Registry Editor
Fortunately, you can work around this error by adding a UninstallWindow DWORD value in the Registry Editor. Here’s how to do it.
- Press Win + R to open the Run dialog.
- Type regedit and click OK to open the Registry Editor.
- In the Registry Editor, navigate to the following location:
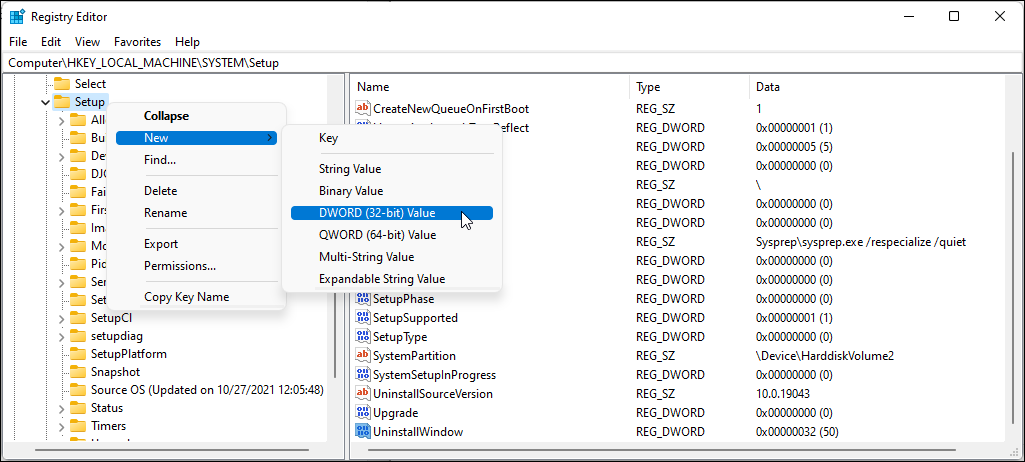
HKEY_LOCAL_MACHINE\SYSTEM\Setup - In the right-pane for the Setup key, locate the UninstallWindow value. If not, create a new DWORD value.
- Right-click on the Setup key select New > DWORD (32-bit) Value.
- Rename the value as UninstallWindow.
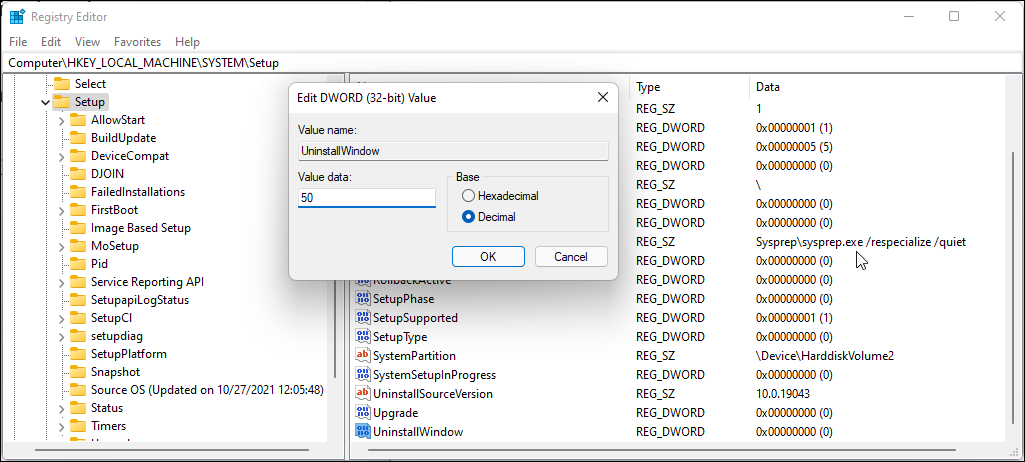
- Next, right-click on the UninstallWindow value and select Modify.
- In the Edit dialog, select the Decimal option under Base. Then, type 50 in the Value data field. If you want to extend the time limit to 60 days, type 60 instead of 50.
- Click OK to save the changes.
- Close the Registry Editor and restart your PC. After the restart, you will have 50 days before the Go back to the previous version of Windows option is grayed out in Windows 1


