15 Tricks to Speed Up Windows 11 Performance Run Extremely Faster
1. Update your system & Restart Your PC

2. Add SSD and More Memory on Windows 11 (RAM/SSD M2 Upgrade)

Increasing the RAM of a computer can help improve its performance and make it faster. You can also consider switching to an SSD if you are using a PC with a hard drive. Believe me, the difference in performance is simply day and night. I have been using an SSD on a 3rd-gen Intel i3 processor and Windows 11 runs flawlessly. A typical 5400 RPM hard drive has a read/write speed of 100MBps whereas a SATA SSD offers a read/write speed of 500MBps. It’s a massive jump of 5x and you will experience the change in boot time, app opening, and overall interaction with OS elements.
If you are using an older desktop or laptop then you can check out some of the best SSDs to buy.So, to make Windows 11 run faster after all the software optimization even on dated processors, you should get an SSD. I would go as far as to say that you should not be using Windows on an HDD!
3. Disable Startup Programs/Apps from running automatically
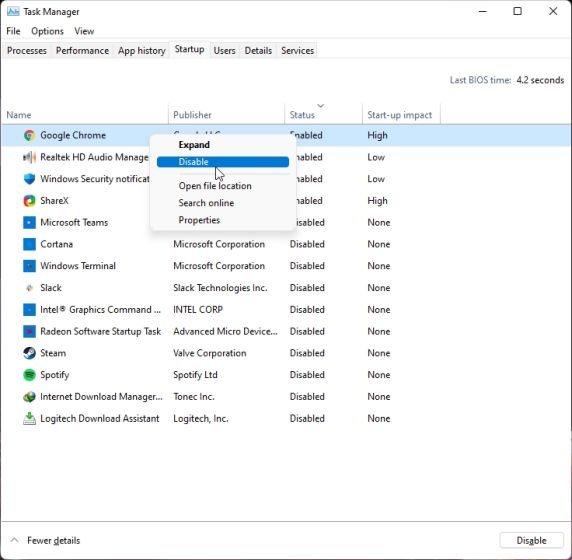
You can start by disabling the startup programs to speed up the boot time on Windows 11. These are the programs that generally start when you turn on your PC. Here’s how to disable them:
- Tap on the Start menu and select Task Manager. This can also be done by using the keyboard shortcut “Ctrl + Shift + Esc.”
- Once the Task Manager menu appears, click on the More details option.
- Now, select the Startup option where you will find the programs that can be disbled.
- Right-click on the program of your choice and then select the Disable option.
Apart from that, there are various startup apps such as Microsoft Teams, OneDrive, and Skype that can hog the resources during startup. Here’s how to fix this:
- Open Settings by clicking on the Windows button. You can also press the Windows 11 keyboard shortcut “Windows + I” to open Settings directly.
- After that, select the Apps options and then click on Startup.
- Once there, turn off all the apps that you don’t want to run during startup. It’s that simple.

As you install more apps over time, this list will keep growing. So, keep in mind that you should do this every so often to ensure no unwanted apps are launching at startup and slowing down Windows 11.
4. Debloat Windows 11
Debloating Windows 11 to improve the performance is another option you can try out. I have already written a detailed guide on how to debloat Windows 11 so you can follow the guide. From disabling Cortana, uninstalling unnecessary packages and apps like OneDrive to removing services, it does everything with just a click.
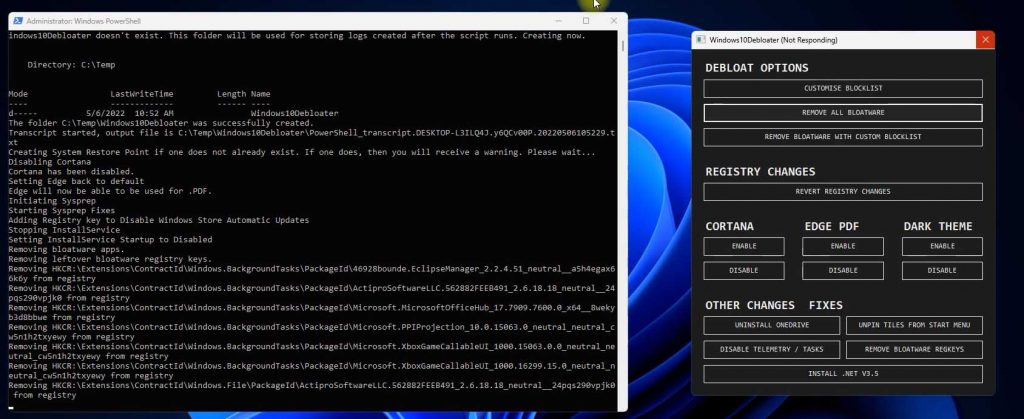
The best part is that it also adjusts your privacy settings and stops all kinds of telemetry services in the background that are responsible for eating most of the system resources.
To use the debloater script:
- Launch Windows PowerShellthrough the Start menu as an administrator.
- Type the below command; press Enterto download the necessary package and automatically create a System Restore Point.
iwr -useb https://git.io/debloat|iex
- Remove unnecessary apps and services, and then restart your PC.
For a more detailed guide on using the Windows10Debloater, check out our dedicated Windows 11 bloatware removal guide here.
5. Disable Animations and Visual Effects
We know some of the best features of Windows 11 are smooth animations, acrylic blur, transparent UI elements, etc. These new UI changes really give a fresh makeover to Windows 11. But again, all these fancy animations come at a cost, especially if you don’t have a dedicated GPU. So if you want Windows 11 to focus on performance rather than on looks, you can adjust the settings accordingly. Here’s what to do:
- Open Settings and navigate to Personalization.
- Tap on the Colors options. Here, disable the toggle for “Transparency effects.”
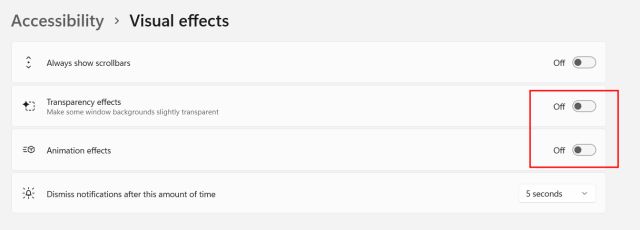
- After that, move to Accessibility from the sidebar.
- Now, select the Visual effects option and disable “Transparency effects” and “Animation effects.”
- Having done that, press the Windows key once and search for “View advanced system settings.”
- Open it and click on “Settings” under the “Performance” section. Here, choose “Adjust for best performance” and click on OK and it’s done.

6.
To help improve your usage, you will often receive notifications and tips and tricks to go about. For this, the PC is scanned, which might end up impacting its performance. Disabling them can prove helpful. Here’s how to disable notifications and tips in Windows 11.
- Go to the Settings option (either by clicking on the Start menu or by pressing Windows+I).
- Select the Notifications option. There you will find two options: “Offer suggestions on how I can set up my device” and “Offer suggestions on how I can set up my device.” Disable both of them.

7. Disable Background apps
There are a number of apps that run in the background to stay updated. While mailing and calendar apps don’t pose a problem, there might be many unnecessary background apps that can make the device lag. To sort this out,
- Right-click on the Windows icon and click on the Apps and Features option.
- You will find a list of apps. Here, just click on the three-dot menu icon next to the apps you want to disable from running in the background.
- Select “Advanced options” and scroll down a bit to get to the Background apps permissions option. Select Never to complete the task.
If you want to quit an app that’s already running in the background, just right-click on the Windows icon and select the Task Manager option. This can also be done by pressing Ctrl + Shift + Esc. Now, select the apps you don’t want in the background and then click the End Task option at the bottom.
8. Disable VBS (For Gamers) & Game Mode
Virtualization-based security (VBS) is a new feature on Windows 11 that protects the OS from unsafe code and malware. It’s part of the Hypervisor-Enforced Code Integrity (HVCI) layer. But recent reports suggest that due to this security feature, games have seen a performance drop of 5% to 25%. Even Microsoft suggests that gaming laptops “may choose to ship with HVCI disabled”. So if you are a gamer and want the best performance on Windows 11, you can just disable VBS.
- To do so, press the Windows key once and search for “Core Isolation.”
- Open it and disable the toggle straight away. Once done, restart the PC and you are done.

If you are not a gamer, it’s best to disable the Game Mode altogether. It will stop DVR and other Xbox-related services in the background, speeding up your Windows 11 PC.
- For this, open Settings and head to “Gaming.”
- Open “Game Mode” and disable the toggle.
- Similarly, open “Xbox Game Bar” and “Captures” and disable all the toggles under both the menus.

9. Disable Restartable Apps
To make your experience faster and smoother, Windows 11 restarts some of the background apps once you sign in to your PC. If you have a powerful PC then this may prove to be a good feature. But for older computers, disabling it would help you speed up Windows 11.
So, to disable restartable apps, just follow the steps below.
- Open Settings and head to the Accounts section. Select the Sign-in options.
- Now, disable the toggle for “Automatically save my restartable apps and restart them when I sign back in” and it’s done.

10. Uninstall Unwanted Software
Removing unwanted files and bloatware can also help you make Windows 11 fast. And this involves a few simple steps to follow.
- Tap on the Windows icon and go for the Settings option.
- Over there, head to Apps and then select Apps and Features. You can also right-click on the Windows icon to get to the Apps and Features option.
- You will now find the list of apps and remove the unwanted ones by tapping on the three-dotted menu and selecting the Uninstall option.

11. Delete Temporary Files & Free Up Disk Space
Another thing you can do is remove temporary files. These are the files that get stored on the PC or the laptop when apps perform tasks, for smooth functioning. However, these files aren’t too essential and can end up occupying a lot of space. You can follow these steps to remove them, and in turn, improve Windows 11 performance.
- Press ‘Windows+X‘ and tap on the Run option. You can also use the hotkey Windows+R to get the option directly.
- Type “%temp%” and select OK.

- You will now be taken to the temporary files folder. Just select them all and delete them.

So if you have made up your mind and want to stick to Windows 11, you can follow our guide and free up disk space on Windows 11. Even if you don’t want to delete Windows 10 files, you can still remove temporary files that don’t have any use on Windows 11. Just follow our guide and you will find Windows 11 performance has improved by leaps and bounds.
12. Use to Make Windows 11 Faster
In addition to this, you can also enable Storage Sense, which automatically cleans up Windows 11 from time to time. To enable it, follow the steps below.
- Open Settings, and click on System in the sidebar.
- Select the Storage option and then click on Enable Storage Sense.

13. Change Power Mode
If you want the best performance on Windows 11 and don’t mind compromising on the battery life, you can change the power plans on Windows 11. It will optimize Windows 11 with the right settings so that you get the best performance out of your machine. We have written a dedicated tutorial on how to change power mode on Windows 11 so you can follow the steps from there. For more such Windows 11 Settings that you should change for a better experience, head over to our linked article.

14. Defragment Hard Disk
With time, files on the hard disk can become scattered and this can also slow down performance of your system. To solve the issue, you can defragment the hard disk via the defragment tool.
Note: Keep in mind, if you are using an SSD then defragmentation is not recommended. It will reduce your SSD’s life.
- Tap on the Windows icon and go for the Defragment and Optimize Drives option.
- Select the drive that you want to defrag. After that, tap on the Optimize option to complete the process.

15. Scan PC for Viruses with AdwCleaner for free! & Don’t Install a Third Party Antivirus.
https://www.malwarebytes.com/adwcleaner#:~:text=How%20do%20I%20scan%20my,only%20takes%20a%20few%20minutes.

👉 JEYI M.2 PCIe Adapter Card with Heatsink, PCIe4.0 X4 NVMe M.2 Adapter
👉 WD_BLACK 500GB SN850 NVMe Internal Gaming SSD Solid State Drive – Gen4 PCIe